How to Add Tomcat Server in Eclipse in 2021
To run web application we need a server to deploy, today we will see how to add Tomcat Server in Eclipse. Earlier we have seen how to create maven web project in eclipse and how to create new maven project in eclipse.
Lets Deep dive into our current tutorial
Tools Used:
Maven: Required for dependency management in web application.
Eclipse: IDE used for development
Apache Tomcat Server: Server used to run the web application.
JDK14: Language used to develop the application.
How to Add Tomcat Server in Eclipse Step by Step Process
Step 1: Download Apache Tomcat Server
To configure Tomcat Server in eclipse we first need to download it from Apache Tomcat Website. We can download it by going to the Apache Website. When we click on the link we land on this below page.
 |
| Apache Tomcat Server Download |
We need to select tomcat from the core category and according to the window bit type we need to download a zip file, in my case, it's 64 bit so I have selected 64-bit windows zip and it will download the zip file on the system.
Step 2: Extract Tomcat Server Zip file To Particular Location
In this step, we need to extract the downloaded Tomcat Server Zip file after storing it at someplace on your system.
At the time of writing the latest stable version is 9.0.37 so we download it.
 |
| Apache Tomcat Server Extracted |
Now we have our server extracted from the zip and the apache-tomcat-9.0.37 folder is created.
If due to some reason you are not able to see it we can simply go to Window > Show View> Servers, as shown above, it will open up the Servers tab at the bottom window.
Step 3: Add Tomcat Server in Eclipse
Now we have our tomcat server we just need to add a tomcat server in eclipse so to do this we open our eclipse and we need to go to the servers tab.
 |
| Servers tab in Eclipse |
If due to some reason you are not able to see it we can simply go to Window > Show View> Servers, as shown above, it will open up the Servers tab at the bottom window.
Now we can add a server using the No servers are available. Click this link to create a new server or right-click on the bottom window and then go to New>Server as shown below
 |
| Add new apache tomcat server |
Step 4: Define a new Server
As we click on Server option a new window popup where we need to define a new server configuration
 |
| Define a new server |
Now we have to select the Tomcat v9.0 Server option and then click Next.
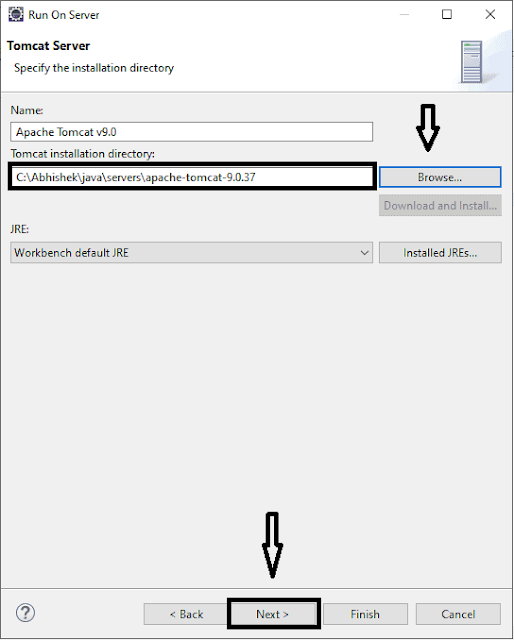
Step 5: Specify Installation Directory
In this step, we will provide the tomcat installation directory location and then click Next
 |
| Specify Installation Directory |
Step 6: Add and Remove resources to configure them to server
In this step, we need to add the web application, we have created one in how to create maven web project in eclipse tutorial.
If our application is on the left panel we move to right using the add button and it will appear as below and then click on the Finish button.
 |
| Add remove resources and configure them on server |
Now our tomcat server will start appearing in the servers tab in the bottom window like below
 |
| Tomcat server appears in the servers tab |
Step 7: Start Tomcat Server
Now we start our tomcat server. Right-click on the server and then click on Start or we can use shortcut Ctrl+Alt+R to start our server.
 |
| Start Tomcat Server |
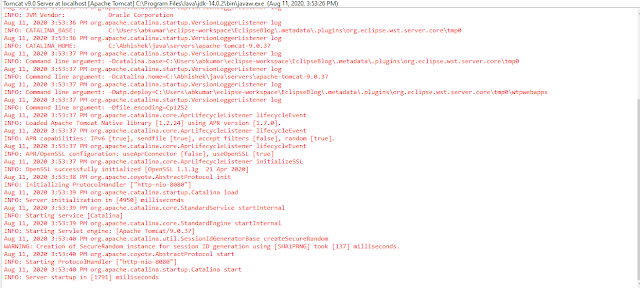
Now server starts up and shows success logs as below
 |
| Apache Tomcat Server Logs |
Now our application runs successfully and application can be accessed at URL http://localhost:8080/{ProjectName}/ which in our case is http://localhost:8080/MavenWebProjectUsingEclipse/
when we access this URL it will show us Hello World.
That's it. we have successfully added the apache tomcat server in eclipse.
Conclusion
In this tutorial, we have covered how to add tomcat server in eclipse and run the maven application after configuring the server and running it on the localhost with Hello World Output.
Eclipse used it this Project creation is Eclipse IDE 2020-06 With JDK 14. We can simply download eclipse from Eclipse official site
Thanks for reading this tutorial so far. If you like this tutorial then please share it with your friends and colleagues. If you have any questions, doubts, suggestions, or feedback then please drop a comment and I'll try to answer your question.
So what do you think about the new Eclipse + Tomcat integration? It's Easy Right?
Happy Learning!!!
More Examples you may like


Comments
Post a Comment
If you have any doubts, Please let me know.