How to Create New Maven Project in Eclipse in 2021
Today we will discuss how to create new maven project in eclipse step by step process. In today's world maven helps us in many ways.
- Gives us a single common place where we define our dependencies that is pom.xml thus all team members have the same dependencies and if anyone updates pom other people get the same version jar dependencies.
- Required jars downloaded from central maven repositories.
- Profile specific configuration access that is we can configure what needs to be used in dev and not in the test environment.
- Lots of plugins like maven-compiler-plugin,maven-war-plugins, build plugins, and many more which easy way of work.
How to create new maven project in eclipse Step by Step process
Step 1: Create New Maven Project
Open eclipse in your system and then click File > New > Maven Project as shown below in image.
 |
Create New Maven Project In Eclipse |
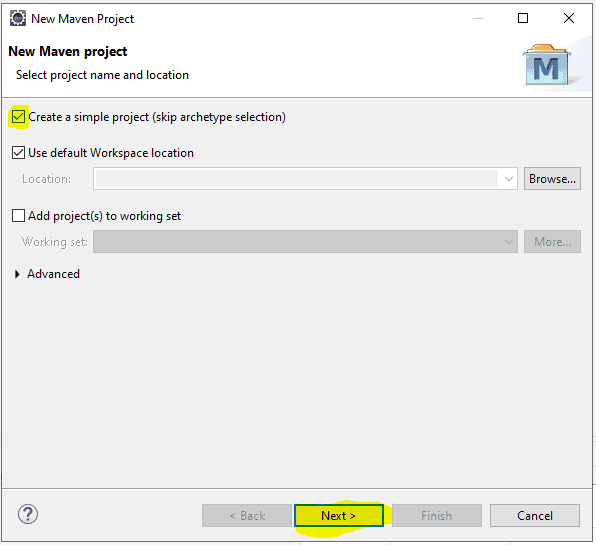
Step 2: Select the Maven Project location and Archetype
In this below window we need to click Create a simple Project checkbox and Use default Workspace location checkbox and then click Next.
 |
Maven Project Location and Archetype
|
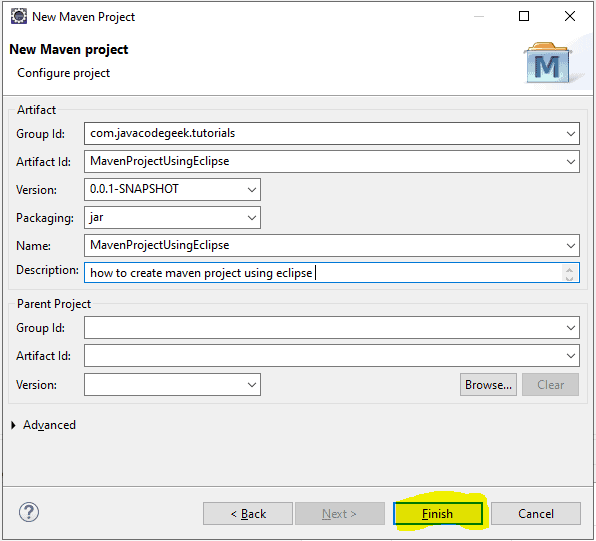
Step 3: Project Configuration
Now we land on project configuration screen where we have to fill out artifact information.
Group Id: It is generally the name of organization and project name.
For example : com.javacodegeek.tutorials
Artifact Id: It is simply the project name by which your project appears in the workspace.
For example : MavenProjectUsingEclipse
Version: Simply version of the packaging which is selected by default.
Packaging: Jar, War type which you want to select.
Name: Project Name.
Description: Simple description of your project.
Now finally click on the Finish button.
 |
| Maven Project Configuration in Eclipse |
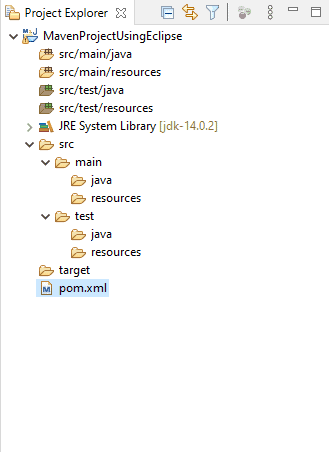
Step 4: Project Architecture
Now our project is ready and will look like below
 |
Project Architecture
|
Next Steps
As our project is ready we can simply see our pom.xml which will look like this
 |
| Project pom.xml view |
That's it We are done with our new Maven Project as this is a simple project where we have not used any archetype (Step 2) as we just selected to create a simple project so our pom.xml is not having any dependencies defined.
Once we create any maven project with archetype used dependencies will be shown in that pom.xml file.
Conclusion
In this tutorial, we have covered how to create new maven project in eclipse.
Eclipse used it this Project creation is Eclipse IDE 2020-06 With JDK 14. We can simply download eclipse from Eclipse official site
Thanks for reading this tutorial so far. If you like this tutorial then please share it with your friends and colleagues. If you have any questions, doubts, suggestions, or feedback then please drop a comment and I'll try to answer your question.
Happy Learning!!!
More Examples you may like


Comments
Post a Comment
If you have any doubts, Please let me know.